Security and Privacy for Everyday Mobile Usage
Everyday
Mobile
Megan Yaur
Stephanie Yaur
Ruhama Tesfa
1 May 2024
20 min read

How to Use This Guide
We recommend all readers read the bolded advice from each section - being as secure as possible certainly doesn’t hurt!
However, we also know that all advice does not apply to everyone so we’ve split this guide into sections. Make sure to read the sections that apply to you and feel free to read anything else! Our goal is to help you.
Mobile App Security and Privacy
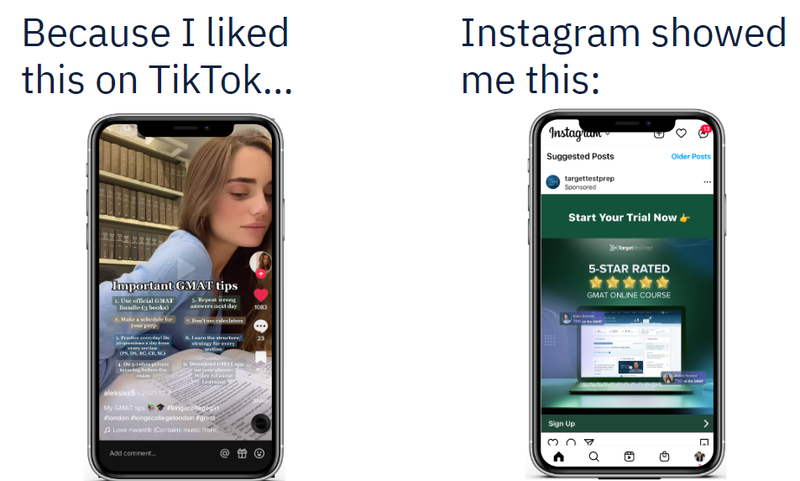
Do you have Angry Birds installed on your phone? TikTok? Candy Crush?
There are so many apps out there that we install to keep ourselves entertained, stay connected with the world, and manage our lives. Many of them are great and safe to use, but some might not be as safe.
Let’s explore how to keep ourselves safe before and after downloading an app.
Heard of The App Store? Use It.
The official app store–for Apple iPhones it’s App Store and Android phones it’s Google Play–is automatically installed on your phone when you buy it. Why? It’s a trustworthy source and here’s why:
- Apps submitted to the app store are reviewed and approved by a professional. This means someone physically downloaded the app to test it, making sure there weren’t any bugs or errors. More importantly, they checked that the app had no malicious behavior. These professionals also check that apps follow app store guidelines.
- Apps in the app store must adhere to certain guidelines that help protect your safety. Some of these guidelines are legal requirements such as the General Data Protection Regulation (GDPR) which is designed to protect personal data linked to individuals in the EU, or the Children’s Online Privacy Protection Act (COPPA) which imposes certain requirements on operators of websites/services directed to US children under 13 years old. Some of these guidelines are also self-imposed by the manufacturers. For instance, Apple requires all apps in their App Store to have privacy policies.
So now that we’ve established why we should be using the app store, let’s understand how it works.
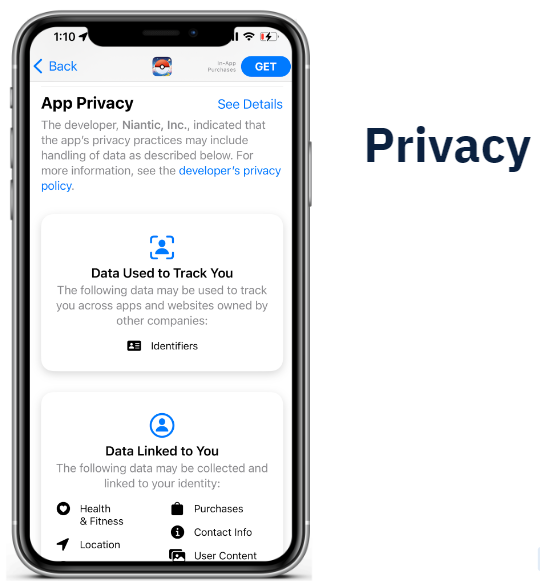
On Apple’s App Store, there are 5 main sections: App preview, Ratings and reviews, Latest version, Privacy, and Miscellaneous information.
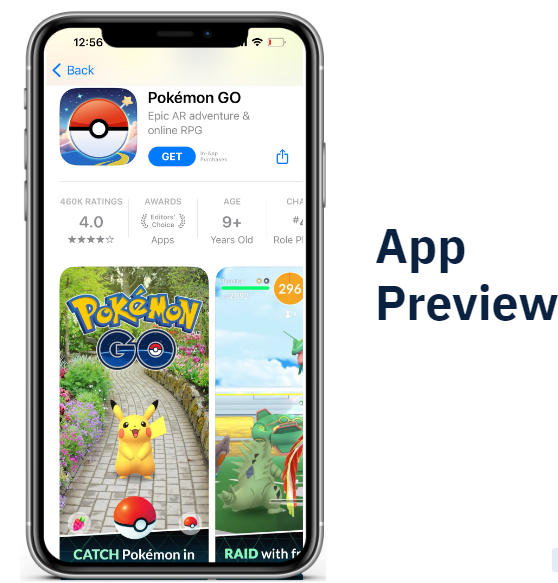
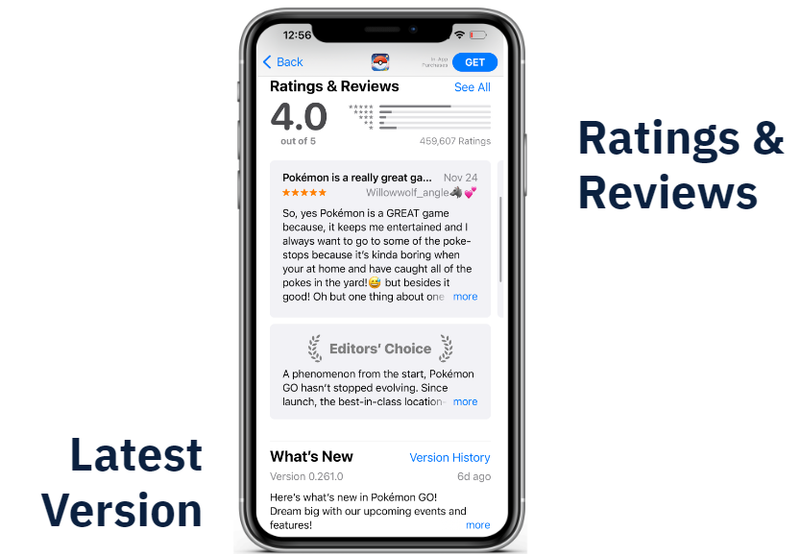
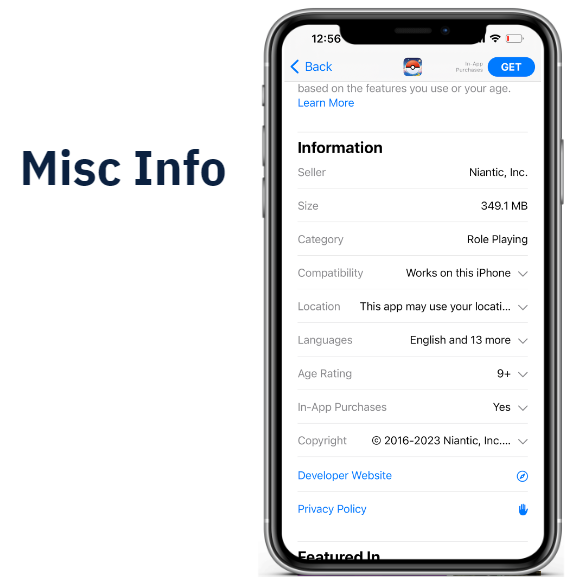
The above pictures show what appears before you download Pokemon Go on an iPhone. Google Play for Android includes similar sections including app preview, ratings and reviews, latest version, data safety, and miscellaneous information.
Let’s break down the privacy section on the App Store:
There are 4 main sections:
1: Privacy policy
2: Data used to track you
3: Data linked to you
4: Data not linked to you
Do I Bother Reading Privacy Policies? Care About These 3 Things.
It’s a well-accepted fact that the average person does not read privacy policies. Let’s face it - they’re disgustingly long and boring.
You’re not wrong here. If we take a look at this infographic created by TechCrunch, it was found that the average privacy policy takes 10 minutes to read - that’s 2,464 words.
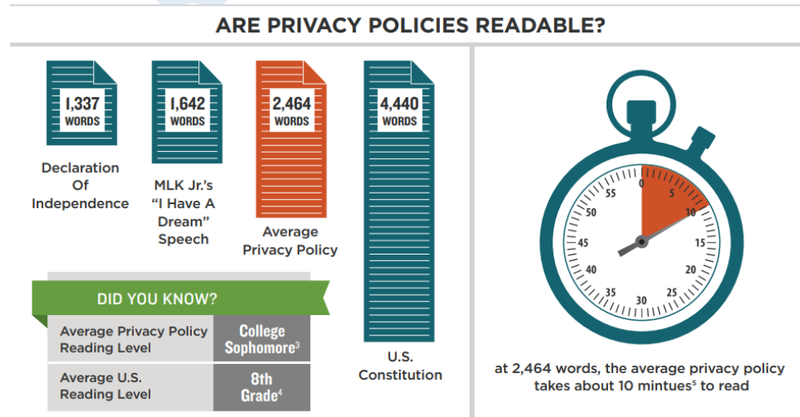
It’s not just that privacy policies are super long, but they’re also notoriously difficult to read. The average privacy policy is at a college sophomore’s reading level whereas the average reading level in the U.S. is only at 8th grade.
If they’re so difficult and time consuming to read, why should we even bother?
Well, you know when you pretend to read the terms and conditions and just check the box so you can get to using that app already? When you click these:
You are legally agreeing to data collection/use data however described in the privacy policy.
We’re with you - we also don’t want to waste 10 minutes reading something we don’t understand. Instead, what you can do is spend 30 seconds looking for these 3 red flags.
DO NOT Download The App If The Privacy Policy Includes Any Of These 3 Red Flags:
- 1: NOT updated within the last year
- 2: Does NOT allow you to delete accounts (check using ctrl+F “delete” or “erase”)
- 3: NO contact information (check using ctrl+F “contact”)
How Do I Know What Data an App Collects From Me?
First, let’s understand what types of data an app can collect.
If we take this section from TikTok’s information on the Apple App Store, contact information and identifiers are fairly vague descriptions:
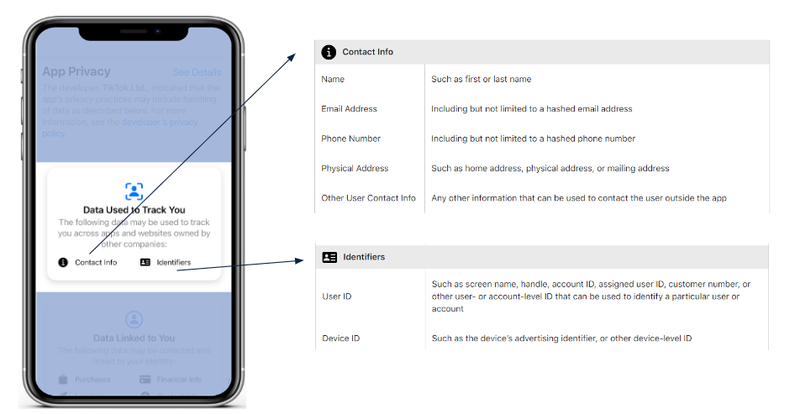
However, Apple has documentation that breaks these descriptors down. Contact information actually includes name, email address, phone number, physical address, and other. Identifiers include user ID and device ID.
You probably didn’t know that contact information actually meant 5+ different pieces of information, so spend the extra 30 seconds looking up what data the app is collecting.
Understand The Data.
1: For Apple users:
2: For Android users:
So now we understand what an app is collecting, the next step is to understand how they are using the collected data.
On the App Store, Apple splits up data usage into 3 categories: data used to track you, data linked to you, and data not linked to you. Let’s talk about the difference between these categories.
What Is Data Used To Track You?
Think third parties and targeted advertisements. Data used to track you includes data that is shared across different apps, ad networks, and companies. Note that these are across apps and websites owned by other companies.
Let’s say it’s the holiday season and your company is about to host its annual holiday party. You start browsing on Google for some formal wear to impress your coworkers, and then later get an ad for an outfit you were looking at on Subway Surfers. How did that happen? This is an example of data used to track you. It happens all the time for instance:
So what should you do about this? Only download the app if you can answer yes to the following:
Am I Comfortable With Any Company Knowing This About Me?
What Is Data Linked To You?
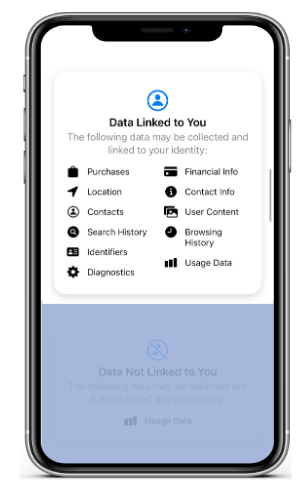
Data linked to you includes data that is collected by the app and linked to you, but not shared with other companies. It’s basically the data this particular company uses to create your identity.
So what should you do about this? Only download the app if you can answer yes to the following:
Am I Comfortable With This Company Identifying Me With This?
What Is Data Not Linked To You?
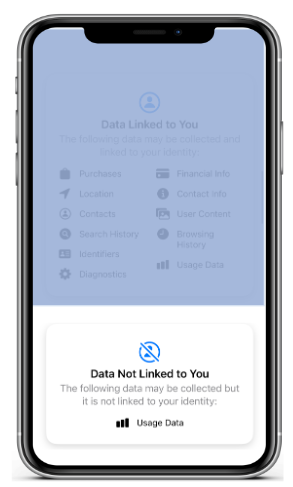
Data not linked to you includes data that the company generally aggregates into larger statistics. It is not linked to your identity. This category often includes usage data which companies aggregate to understand how people are using their app.
Make sure nothing in this category is specific to your identity. If you can identify yourself using just the data in this category, do not download the app.
Let’s Talk About Dangerous Apps
Never Download Apps From a Website.
Why? The main reason is to avoid bad apps. When we say a bad app, we are talking about what is professionally dubbed a Potentially Harmful App (PHA). A PHA is an app that can put you, your data, or your phone at risk. In other words, there are malicious intentions behind this app which can include collecting your private information without consent, charging you money in intentionally deceiving ways, or even taking control of your phone.
A Potentially Harmful App is a harmful app, so what’s with the “potentially”? Simply put, it just depends on your phone. A PHA can be potentially harmful for one phone but not another because malicious apps function differently depending on a variety of variables. For example, a shiny iPhone 14 Pro might not be affected by EvilAppHehe which uses a deprecated service to perform malicious behavior, but an iPhone 7 which is running an ancient, outdated version might be at risk.
This is why you should always update your phone’s software.
How Can I Steer Clear of Dangerous Apps?
So how can you avoid a PHA? The simple answer is to only download apps from the app store.
Before you click download on the app store, make sure you read the reviews as well.
Spare 5 Seconds And Read The Top Three Reviews.
While the app store is a trustworthy source, this does not guarantee that apps on there are 100% safe and risk free. It’s possible that the reviewer missed something as small as a malicious line of code, so always check what other people say about the app. If the app is “sketchy” or glitchy, you’ll immediately know from the comments.
Got Any Apps? Follow These 5 Tips To Secure Them.
Venmo? Uber? Chrome? TikTok? Facebook? Instagram? Grubhub? Candy Crush? Subway Surfers? Surely you’ve got at least one app installed on your phone.
We’re going to step through 5 general tips to secure already installed apps:
1: Review app permissions
2: Limit location permissions
3: Limit integrating external accounts
4: Delete unused apps
5: Update app software
Can I allow Chrome to access all of my photos, camera, microphone, etc?
The short is no. Don’t give Chrome or any other app automatic access to these permissions if it’s not necessary.
Remove unnecessary permissions. Choose the least invasive option possible.
For instance, there is a toggle that allows Chrome to always have access to your camera versus asking for permission when a website requests it. The least invasive option is to have conditional permission as opposed to unrestricted permission. The camera permission should be toggled off as shown in the picture below.
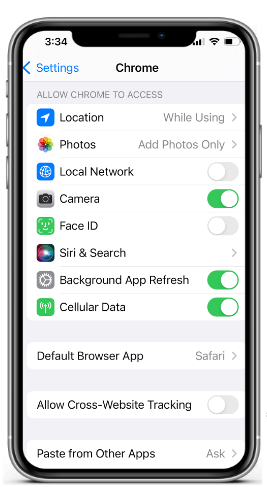
As shown in the image above, another permission that should be monitored is the one that grants access to photos. Chrome should only have access to a select few photos which are given by the Add Photos Only permission. The least invasive option here is to limit what photos Chrome has access to–by manual selection–as opposed to giving Chrome access to your entire camera roll. Another way to frame this is to ask yourself: Does Chrome really need access to my family portrait, that mirror selfie, or evidence someone stole a bite of your food? Only choose the option that you can confidently answer yes to - yes, this app needs this permission setting at any point in time.
So how do you do this?
Go to Settings → Scroll to your app
And just go down the list! Yes, you do need to manually go through each of your apps. While it might take a good 20 minutes to review, the payoff is worth it.
Pay special attention to contact list, camera, storage, location, and microphone permissions. These are particularly private permissions that can reveal a lot about one’s identity.
Can I allow Google to always access my location?
This time, the definitive answer is no. Don’t give Google or any other app persistent location permission. Why? Because it’s not necessary.
Hopefully you haven’t already forgotten the first piece of advice given above: choose the least invasive option possible.
Set location access to “While Using” or less
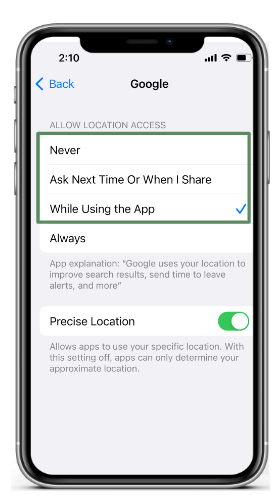
This means Never, Ask Next Time Or When I Share, and While Using the App are all ok. Never would of course be the least invasive option, but if you’re going to end up Googling “Restaurants near me” or “Target hours”, it makes sense to give Google conditional access to your location with the Ask Next Time permission when you ask a location-based question.
Regardless, never choose always. This would be voluntarily giving every website you visit your location.
To change your location settings:
Go to Settings → Privacy and Security → Location Services
And just go down the list! This should only take about 3 minutes.
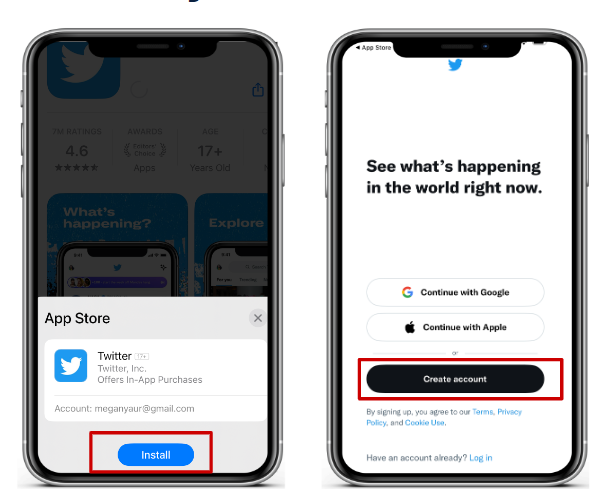
I just downloaded an app. Should I sign in with my Google or other existing account?
The general answer is no. You’ve probably seen a screen like the one below where you’re given an option to create a new account or link it to an existing one - something like Continue with Google or Continue with Apple.
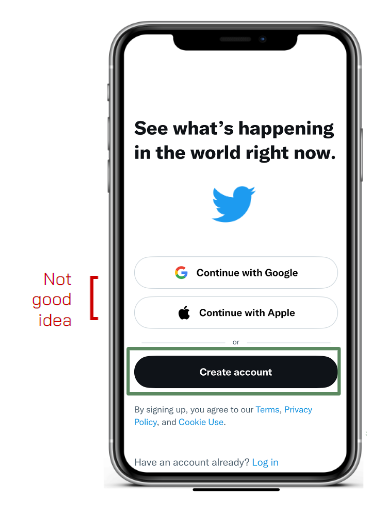
In the above scenario, you should not continue with Twitter by linking your Google or Apple account. Why? The two will share information with each other. If you use Twitter with your Google account, Twitter would know all of your Google data (e.g. browsing history) and Google would know all of your Twitter data (e.g. who you follow). We want to minimize what one company knows about you, so keep them separate.
There is however one caveat.
Only link existing accounts if the two are similar.
According to a study published by NordPass in 2020, the average person has 100 passwords. That’s crazy! And also impossible to memorize. Let’s be real, this is why you reuse passwords all the time, right?
Password reuse is risky in the unfortunate event it gets cracked and suddenly an attacker gets access to the 20 other apps/websites you use it for. Thus, it can save yourself the effort of memorizing a new password when you do link accounts. If the account you’re linking to is similar–meaning it probably has the same data on you as this new app would collect–then it’s actually a smart idea to link the two accounts.
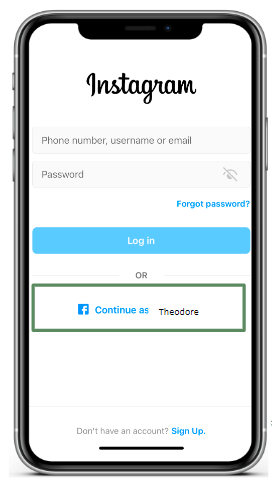
In the above case with Instagram and Facebook, linking is a good idea since the two will have similar information on you.
Forgot you had an app downloaded? Delete it.
This one’s pretty straightforward. The general rule of thumb:
If it’s been over 3 months since you last used an app, delete it.
If you aren’t using it, the app is just taking up storage space and opens you up to possible vulnerabilities.
If you don’t know if it’s been over 3 months since you last used an app, you can check the last time you used each app:
Go to Settings → General → iPhone Storage
And just go down the list! Look for the “Last Used” label under each app. If it’s been over 3 months since you last used it, it’s time to put it in the trash.
Are you running an older version of TikTok? Instagram? Another app? Update it.
Keep all apps up to date.
Running older versions of an app can open your phone up to possible bugs and vulnerabilities. The latest version is always the most recently reviewed, not to mention it offers the newest features.
Instead of manually updating each app whenever you remember, you can automatically update your apps.
Go to Settings → App Store → turn on App Updates
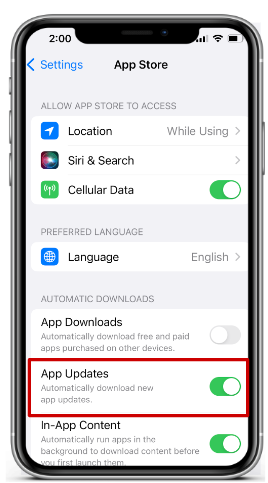
It only takes 5 seconds to keep your apps that much more secure.
Mobile Connection Tech
Do you have home wifi?
Wifi is a wireless technology that is used to connect computers, tablets, smartphones, and other devices to the internet. The internet is the collection of all websites that you probably regularly visit, like google.com, youtube.com, or amazon.com. In fact, you might even be reading this manifesto on a website!
To connect to wifi you need to get a piece of equipment called a router. Therefore, to secure your home wifi, you need to secure the home wifi and router.
How do I secure my router?
By default, when you purchase a router, it comes with a default username (like admin) and password (like password123). The purpose of the default admin and password is so that you can login into your router account and then CHANGE the password to something personalized. Anyone can look up the username and password online or hack it in a few seconds, so if you don’t want anyone peeking at everything you do online or changing your wifi settings to something easily hackable, then…
Change your router password from the default factory password
1: Look at the bottom of your router. Find the IP address i.e. 192.168.0.1. Type the IP address into your web browser (i.e. Google Chrome, Safari, Samsung Internet) and hit enter.
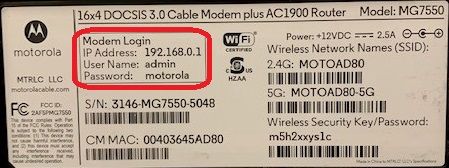
2: Now that you’re on the router dashboard website, you will need to login. Use the username and password also on the bottom of the router to login.
3: Some router providers may prompt you to create a new password when you first login, but if not, then you should be able to go to Settings → Account or another similar variation to change the password.
Any password will not do though! When creating the router password…
Make sure your router password is different from your wifi password
Your router and wifi passwords should be different because if a hacker can guess one, you don’t want them to get access to both your router and wifi. If they get access to your router, they could change your router settings to have the lowest level of security and make it easily hackable. Another attack could be to change your router settings to redirect you to malicious websites. If they have access to your wifi, they could view everything you do on the internet and get your login credentials or use your wifi to perform other illegal activities.
How do I secure my wifi?
Now that your router is secure, you can change the router settings to secure your wifi.
Update router settings to WPA2 personal
There are different levels of security that your router can have: WEP, WPA, or WPA2. WPA2 and above are the most secure options wifi networks, they are harder to hack.

The reason why WPA2 is more secure is because it sends your information to websites, such as usernames or passwords to a bank account, in an encrypted or secret code, so even if a criminal were to attempt to see what information you’re sending to your bank, it will be difficult to decode your password.
So here’s how to change your router to select WPA2:
1: Look at the bottom of your router. Find the IP address i.e. 192.168.0.1. Type the IP address into your web browser (i.e. Google Chrome, Safari, Samsung Internet) and hit enter.
2: Now that you’re on the router dashboard website, you will need to login. Use the username and password also on the bottom of the router to login.
3: In the menu, go to Wireless → Security. Router providers may have menu formats, so this path may depend, but you just need to find the Security options.
4: Change the encryption option to WPA2. It might be on WEP right now.
That’s it! Now your information is much more secure on all websites you visit!
Starbucks Wifi, Anyone?
Do you use public wifi? It’s so convenient and free! Have you ever stayed to work in a cafe after getting some coffee? Or did some last minute work before your flight in the airport using the convenient airport wifi?
Unfortunately although using public wifi might seem convenient, those scenarios might have put your personal information in danger.
In 2017, a guy named Noah Dinkin went to a Starbucks in Buenos Aires and connected to the Starbucks wifi. His computer alerted him that the connection was delayed, so he (a guy working in tech) did some investigating and found that the computers connected to the wifi were being used to mine for cryptocurrency in the first 10 seconds that they were connected. Mining for crypto means solving complicated mathematical equations to verify crypto-currency transactions and for computers who are first to solve a challenge, they get rewarded with newly minted "coins”. It takes a lot of computing power and there are actually types of attacks where you use up all of a devices’ computing power so that you can’t do anything anymore.
Of course, Starbucks quickly fixed the issue and removed a line of code that made the computers do this whenever they first connected. To this day, no one knows the name of the hacker that added this code.
In the end, the result of this Buenos Aires Starbucks story wasn’t terribly malicious but the idea is that someone was able to change the script so that everyone’s computer was forced to do something they didn’t want to do - think about what else hackers could do!
How do I prevent public wifi attacks?
To prevent public wifi attacks, follow these steps:
Use https instead of http, especially on public wifi.
The s in https stands for “secure”, so https is more secure than http. Https encrypts your information (basically sends any information like passwords or usernames in secret codes so any interceptor cannot just read them), while http does not. Http allows anyone who intercepts your information while it’s being sent to a website to be seen. In fact, anyone can download a tool (for example, Wireshark) that allows users to see what usernames and passwords people are sending to websites over http. For people using https, the only thing that these tools can see are random letters and numbers that won’t make sense to any casual onlooker.
To use https, just add https to the beginning of your url (i.e. https://www.google.com INSTEAD OF http://www.google.com.)

Google Chrome and many other web browsers automatically redirect you to the https version of websites whenever you go to a website, but just to be sure, before you put any secure information into a website, make sure there is https in the url, not http.
Better yet, just don’t access any personal information sites i.e. your bank
Even if you use https, remain wary of getting your information stolen. People could look over your shoulder (called shoulder surfing), hack encrypted data sent through https, and public wifi router settings are likely not on the highest level of security. There’s no way for you to change the router settings at your nearest Starbucks and someone could pull a Buenos Aires Starbucks stunt with even more malicious intentions.
EVEN better yet, don’t use public wifi! Use mobile data instead.
Bottom line: public wifi is not as secure as personal wifi, so to prevent hackers from getting access to your information over public wifi, don’t use public wifi! Using mobile data is much safer.
Mobile data is another way you can connect to the internet that is offered by your mobile provider (i.e. Verizon, AT&T). Mobile data is encrypted, like the WPA2 router setting, so your information will be unreadable to hackers that intercept the data you send to websites.
Your phone settings likely prioritize using wifi over mobile data, so to use mobile data…
1: Turn off wifi
- For iPhones, swipe down on the right side of your phone to bring up the quick settings. Click the wifi button if it’s blue to turn it off.
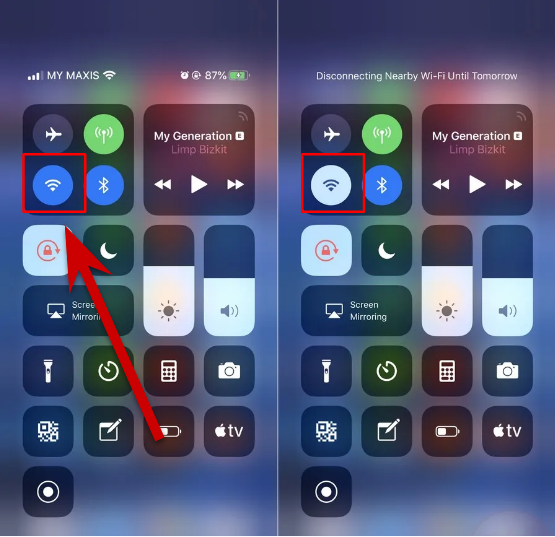
- For Androids, swipe down and click the wifi button if it’s filled in to turn it off.
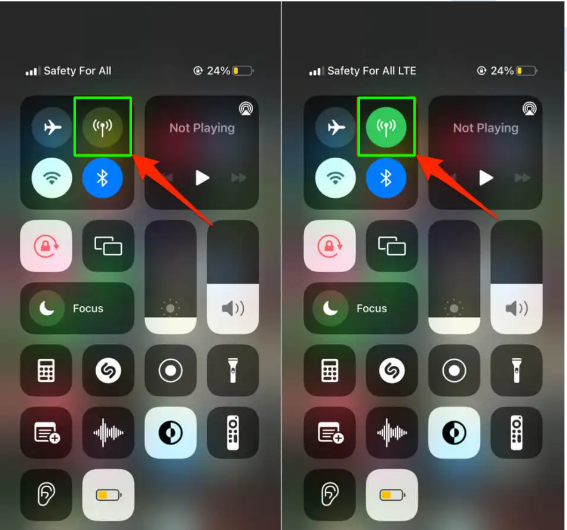
2: Turn on mobile data
- For iPhones, on the same quick settings, click the mobile data button so that it’s filled in.
- For Androids, on the same menu, click the mobile data button so that it’s filled in.
Do you use Airpods or any other wireless device?
Do you use bluetooth? If you use Airpods, wireless headphones, wireless mice, wireless keyboards, then you do!
Bluetooth is another form of mobile connection technology that can be manipulated for malicious uses.
In Bournemouth, a town in the UK, a student went to go pick up his prescription and then received an automated message that looked just like someone was sharing someone’s contact info with him. Then a few months later, he went back to get another prescription, parked in the same spot, and received the same message. Noticing that something was off he brought a friend and then both he and his friend received the messages. This person received the same strange message on 3 separate occasions, everytime he went to the same area. They notified the police and the police discovered that this was a bluetooth attack and issued an order to turn off bluetooth when not in use in the area.
How do I prevent bluetooth attacks?
Here’s how to prevent these kind of attacks:
Turn bluetooth off when not in use
Besides sending unwanted messages, hackers can also check to see what other devices you’ve connected to before, spoof (pretend to be) one of those devices, and then connect to your device. Hackers can only see what devices you’ve connected to before if it’s discoverable (see next tip) and if your bluetooth is on. Therefore, turn off bluetooth when you’re not using it! That means most of the time it should be off.
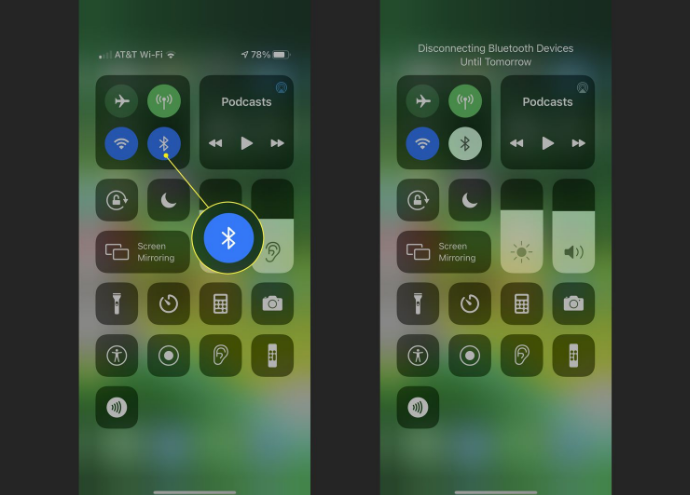
1: To turn off bluetooth,
- On iPhones, swipe down from the top right of your screen to display quick settings. Click the bluetooth icon if it’s blue to turn it off.
- On Android, swipe down to display quick settings. If the bluetooth icon is filled in, click it to turn it off.
Don’t open your bluetooth settings in public
Opening your bluetooth settings leaves your phone in discoverable mode for 2 minutes. Discoverable mode means that all other devices will be able to see your phone as an option to connect to through bluetooth, and so hackers will be able to conduct the spoofing attack. They will be able to first see your phone as long as they are nearby, then have ways to see what devices you have connected to in the past. Say they see that you have connected to “John’s Airpods” in the past. Then they can rename their device to anything and so can also rename their malicious device to “John’s Airpods” (aka spoofing). You might then purposely connect to “John’s Airpods”, not knowing that this is actually the attacker’s device. Now the attacker is connected to your phone!
Everytime you open your bluetooth settings, there’s actually a disclaimer at the top stating that your device is now discoverable to all nearby devices. As an example, I, Stephanie, opened my android phone bluetooth settings and then also opened another person’s, Megan’s, iPhone bluetooth settings.
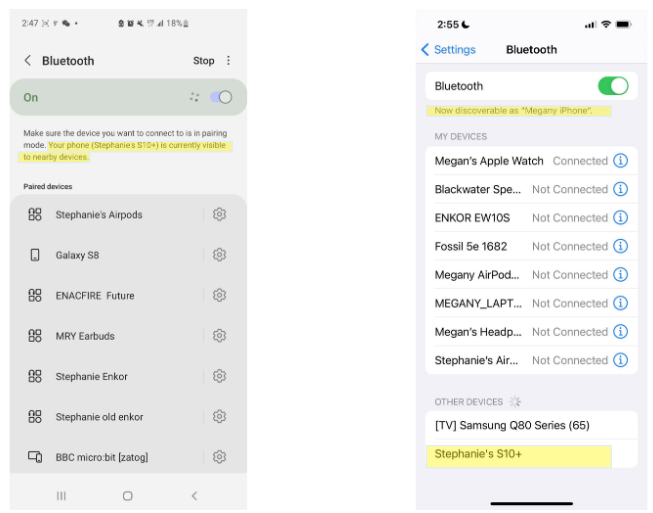
As you can see, my device (left) called “Stephanie’s S10+” is discoverable on Megan’s (right) device. Her device also says that it’s discoverable. So don’t open your bluetooth settings in public! You can very easily turn off bluetooth (see tip above this) without actually opening the settings.
Do you use Google Maps or Apple Maps? Uber/Lyft? Grubhub? Or any other location-based app?
Do you ever use location-services? Chances are you do. Location services is a phone feature that shares your location with apps. For example, for Google Maps to get your phone’s location, location services need to be on and given permission to share your location with Google Maps. Any app that has access to your location needs permission to use location services.
Unfortunately, sometimes it’s not great for other parties to know your location.
Having access to your location can inform other parties about your daily/weekly habits, which can be dangerous; it increases the predictability of your current or future location. For example, if apps find out that you’ve been going to Whole Foods every Saturday from 2-3pm, then someone might try to find you there during your weekly visit or know when you’re not at home.
With just a few locations, other parties will also be able to build a data profile about you. Go to Whole Foods and yoga studios? Chances are you might be a health fanatic. Targeted ads might start appearing such as Lululemon or Peloton. Or worse, hackers could use this data profile to end up stealing your identity.
How do I prevent third parties from knowing where I am?
Don’t allow apps location permissions unless the app can’t function without it (i.e. google maps)
Since location services can provide vulnerable data, just don’t let apps see your location unless you need to! A rule of thumb is to just allow your maps app, ride sharing, food delivery, and weather app to know where you are ONLY WHILE using the app. There is no benefit for you to tell apps where you are when you’re not using them. Reference the app’s advice sections above to learn how to change app permissions.
Turn off location services when not in use
An easy way to make sure apps do not know where you are is to simply turn off location services. Whenever you are not using an app that requires location (i.e. Google Maps), turn off location services. Apps do not need to know where you are unless you need them to know.
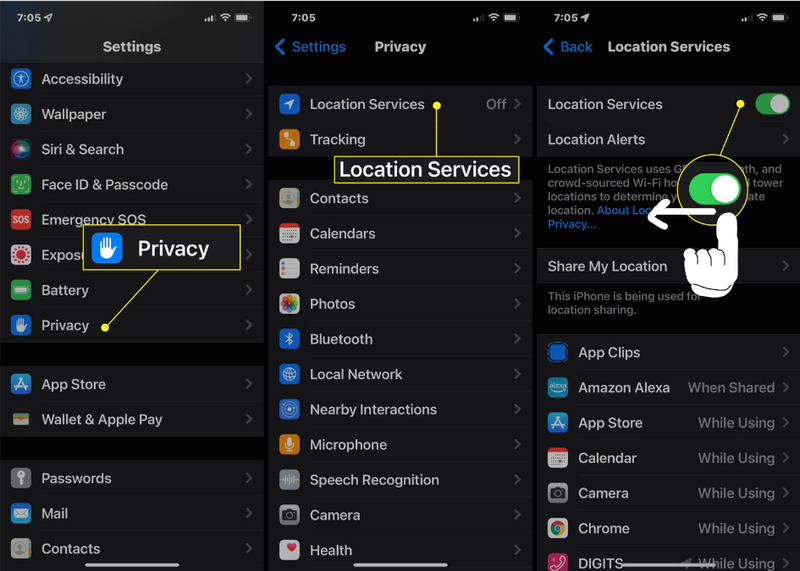
1: To turn off location services…
- On iPhone, open your Settings. Click on Privacy → Location Services and then swipe the Location Services on/off button to the left to turn it off.
- On Android, bring up the quick settings dropdown menu (swipe down) and click the location button so that it is no longer filled in. Click again to turn on ONLY when using apps that rely on your location.
Disclaimer: Do note, however, that just because your location services are off, it does not mean that you are untrackable. Wifi towers and your mobile data provider still know your location - remember that location services is the service that tells apps where you are. There are other ways to get your mobile device location.
Securing Your Phone
In the event that someone does end up stealing your phone, you need preparative measures to ensure that you can try to get your phone back and that they can’t get any valuable information out of it.
Should I use a traditional password or biometric to secure my phone?
The traditional password is a series of alphabetical/numerical characters used as a lock to a device or account i.e. password123. Biometrics are another form of password: they are body characteristics that are used for passwords. On mobile phones, that can include face recognition or fingerprints.
Now you might be wondering which is more secure. Surely a thief likely won’t be able to simulate my face or fingerprint, right?
First and most obviously, have a password to your phone. If there’s no password, then a thief will have access to absolutely everything. Any kind of password - an alphabetical/numerical or biometric - is the bare minimum. Now that your phone has a password, you might be wondering which type of password is more secure.
It doesn’t matter if you use a biometric or traditional password because traditional typed passwords are ALWAYS the fallback. Your typed password in the end has to be strong.
While it might seem more difficult to simulate someone’s face, in the end, after several incorrect biometric attempts, your typed password will be requested. Therefore regardless of the type of password you use, your typed password needs to be strong otherwise a hacker will be able to unlock your phone. A good rule of thumb for creating strong passwords is that the longer, more complex, and no self identifying info the better. Complex means special characters (i.e. @#$%^&*), numbers, and capital letters. You should not use any self identifying information in your password because they are easily guessable. That includes birthdays, names, places, hobbies, etc.
How do I find my phone if it gets lost or stolen?
Remote tracking allows you to see the real-time location of your phone from another device. But to use remote tracking, you need to turn it on BEFORE you lose your phone. Just to be on the safe side, turn it on while you still have your phone!
Turn on remote tracking while you still have your phone
1: To turn on remote tracking,
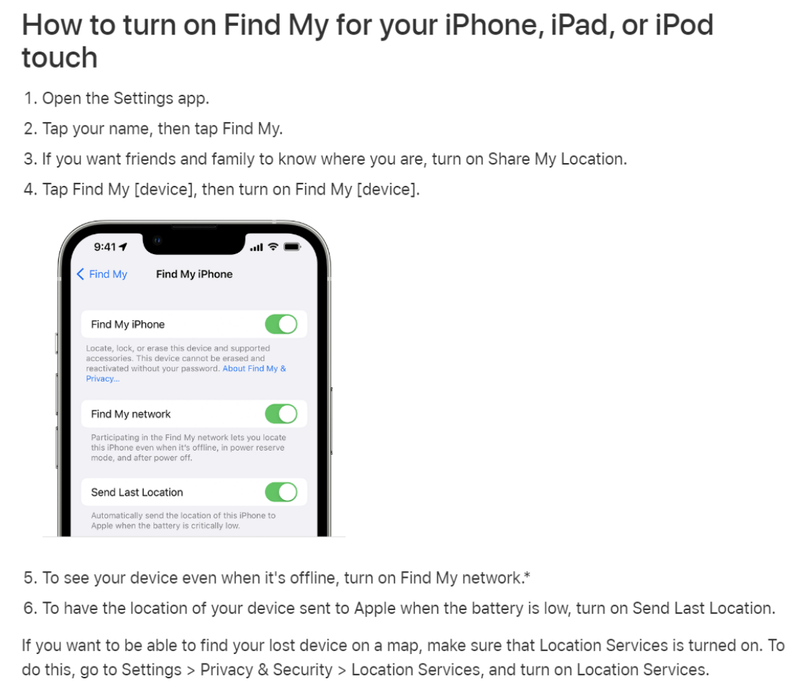
- On iPhone, go to https://support.apple.com/en-us/HT210400 or follow this guide from Apple Support:
- On Android, go to Google's Support Center or follow this quick summary. Open Settings → Security → Find My Device and turn on Find My Device.